
Welcome to Kubernetes 101 tutorial. Hope you will find this useful.
What is Kubernetes?
Kubernetes, also known as k8s, is an open source system that helps us in automatic deployment, scaling and management of out containerized application.
Table of Contents
The building blocks
Following are the important building blocks associated with Kubernetes.
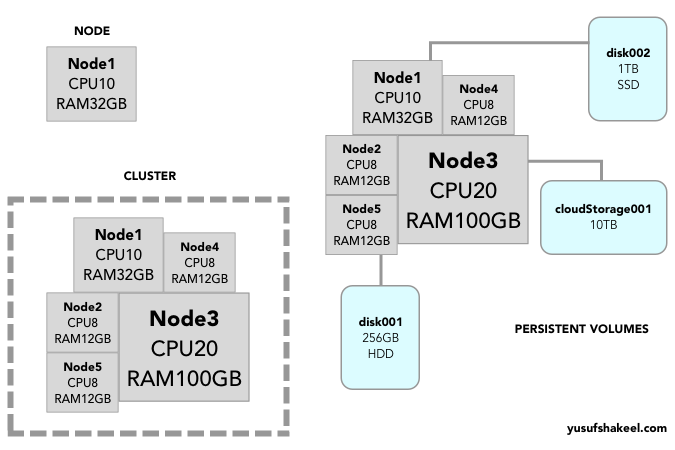
Nodes
A node is the smallest computing unit in Kubernetes. This can be a physical machine or a virtual machine of varying specifications. We can have Nodes with 1GB RAM and single core or 32GB RAM and multiple cores.
So, a node is just a computing unit with certain amount of resources. Cloud service providers like Google options to easily setup and configure Nodes.
Cluster
Each node is a tiny computing machine and when we pool multiple nodes together we get a big computing machine and it is called the Cluster.
So, a Cluster is a collection of nodes that work together and gets the task done.
It is quite easy to replace nodes, add new nodes and remove nodes from a Cluster.
As developers, we don't have to worry about in which Node our application is running. All this is taken care by the Cluster.
Persistent Volumes
Nodes in our cluster can be added or removed and our application can get deployed to any of the Nodes (unless explicitly specified) so it is obvious that we are going to need a permanent place were we can store our data.
Note! We can save data inside a node. However, a node can be removed easily so it is not recommended to save important data that will be needed later.
Persistent volumes are the permanent storage locations used to save our data. They are mounted to the cluster and are accessed by the nodes. So, even if we remove a node from the cluster we still have our data saved in the persistent volume.
In the following image we have a node at the top left corner. Then we have a collection of nodes forming a cluster. Finally we have mounted persistent volumes.
Container
In the Docker 101 tutorial we learned how to create Docker image and then publish it to DockerHub.
In Kubernetes, our application code is packaged as a Docker Image which then runs as a container.
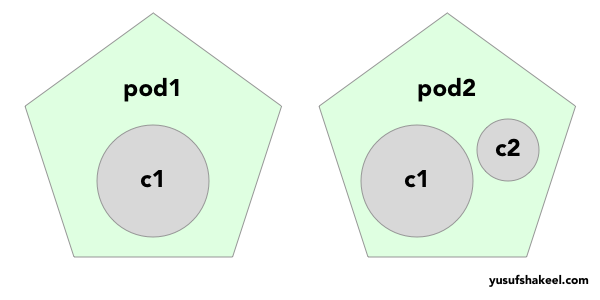
Pod
A pod is the smallest unit that gets deployed in Kubernetes. It is a wrapper over our container.
Note! Ideally a Pod has only one container. However, we can have multiple containers inside a single Pod and these containers will then share the network and resources.
In the following image we have two pods - pod1 and pod2. The pod1 has one single container c1 whereas, pod2 has two containers - c1 and c2.
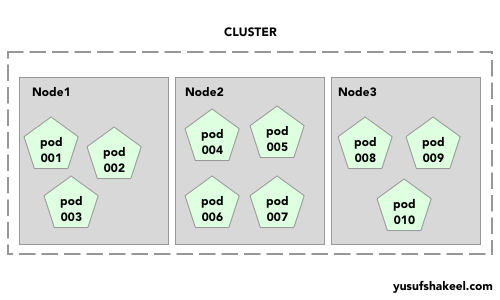
As per demand, we can have multiple pods running inside our Kubernetes cluster to serve high load. All of these pods will be running the same application code.
Note! A pod is ephemeral. This means it can die and get replaced by a new pod. So, if our application code creates files inside a pod then it gets lost when the pod dies. Therefore, we must save important data in a persistent volume.
Managing Pod manually is not easy and hence we have ReplicaSet and Deployment in Kubernetes.
Kubernetes objects are persistent entities in the Kubernetes system. Kubernetes uses these entities to represent the state of your cluster.
Replica Set
Replica Set is a Kubernetes object that maintains a certain number of pods running at any give time.
Say, we have a Payments microservice and in order to server normal traffic we need minimum 100 pods. To achieve this we create ReplicaSet, which dictates the number of running pods needed at any given time. So, if a pod crashes and dies, a new pod is created and deployed to the cluster.
Deployment
Deployment tells us about the number of replica pods that needs to be maintained. It helps in scaling the number of pods in the cluster effectively and also help in rolling out new updates and if needed, rollback to earlier deployment version.
Setup Kubernetes locally
We can use any of the following to run Kubernetes on our local machine.
- Docker Desktop
- Rancher Desktop
After installing the above software we will also need to install kubectl. Head over to Kubernetes website and in the Install tools section you will find the installation steps.
I am using Rancher Desktop and when I run the following command in the terminal on Mac I get the node details.
➜  kubectl get nodes
NAME                   STATUS   ROLES                  AGE    VERSION
lima-rancher-desktop   Ready    control-plane,master   271d   v1.26.4+k3s1
And if I try to list the pods, I get nothing.
➜  kubectl get pods
No resources found in default namespace.
Deploy a pod
Now, let us deploy a pod using the yusufshakeel/learn-k8s image.
➜  kubectl run learn-k8s --image=yusufshakeel/learn-k8s
pod/learn-k8s created
The name of our pod is learn-k8s and we are using the image yusufshakeel/learn-k8s which is coming from DockerHub.
A pod is deployed and we can list it using the following command.
➜  kubectl get pods
NAME        READY   STATUS    RESTARTS   AGE
learn-k8s   1/1     Running   0          12s
Inside a pod
Now, we can get into the pod using the following command.
➜  kubectl exec -it learn-k8s -- /bin/sh
/app #
The yusufshakeel/learn-k8s application runs on port 3000 so, we can easily CURL and get the response.
# curl localhost:3000
{"data":{"message":"Hello, World!","hostname":"learn-k8s"}}
Type the exit command in the terminal to exit out of the pod.
Delete pod
Run the following command to delete the pod.
➜  kubectl delete pods learn-k8s
pod "learn-k8s" deleted
Alright, we have reached the end of this tutorial. Hope this was helpful. Do practice the steps.
See you in the next tutorial. Have fun learning.